Hi. I’m Luis, from Triona and I am going to give you a few tipps if you are about to start working with NestJS. If you do not know what that is, allow me to give you a short introduction.
NestJS is a framework to develop NodeJS server-side applications. After being released by Kamil Mysliwiec in 2017 it has gained popularity very fast, being on the Top 10 most popular server-side frameworks on GitHub at the beginning of 2022 https://statisticsanddata.org/data/most-popular-backend-frameworks-2012-2022/. If you, like us in Triona, have previous experience with Angular and Spring Boot, NestJS will appeal to you as very friendly framework with a rather smooth learning curve, excellently documented, and you will be able to move to advanced topics quite fast. If you use it for any serious project, you will also see that the projects can be structured in a comprehensive way, and that with a good IDE, like Visual Studio Code, you can work very efficiently. The resulting applications are also very light, display a very competitive performance (see https://varteq.com/java-vs-nodejs-on-aws-lambda-benchmark-survey/) and are easily scalable.
Getting started up to a „Hello world“ stage is easy. You only need to do this:
- Install NodeJS https://nodejs.org/. We recommend to install Visual Studio Code as well https://code.visualstudio.com/ and add a few extensions to it. We assume you are also familiar with Git.
- Now that you installed NodeJS you can verify that it does not simply run JS code, it comes with batteries included: the Node Package Manager (npm) https://www.npmjs.com/
- Install NestJS CLI.
- Create a sample project
- Run it in Development mode. In this mode the app will be recompiled and restarted every time you save changes

>> node --version
This will display your node and npm installed versions. Should be 14+
>> npm i -g @nestjs/cli
This will install NestJS and its Command Line Interface.
>> nest new sample-project
Autogenerates a new project named „sample-project“. You can find it in the directory with that name.
>> npm run start:dev
Starts the application in developer mode. This means, changes in the project files will cause the app to automatically recompile and restart.
The app should now be running and accessible at localhost:3000, you can check it in your browser.
That was embarrasingly trivial and I would hate to just leave you there without further hints. That’s why we are going to add a little extra advice.
PROJECT SETUP
If you already know Angular and/or Spring then understanding some concepts will be easier for you. On one hand, Angular uses also npm and is written in Typescript. Being familiar with those technologies will speed up your learning process. And on the other hand, if you have worked with Spring Boot, you will be familiar with concepts like REST controllers and persistence libraries that are configured and documented with annotations and Dependency Injection, wich are a common place in other Java-based frameworks – but not natural to Javascript ones.
In the following table you will find useful analogies between elements on Spring Boot and their equivalent in NestJS. It will let you orient yourself a little faster in the NestJS ecosystem.
Projektstruktur, Einstellungen und Umgebung:
| Spring / J2EE | NestJs |
| Java JVM | Javascript Node |
| Maven POM | Node Package Manager (npm) package.json |
| .m2/ target/sample-app.war | node_modules/ dist/main.js |
| @SpringBootApplication @Configuration | main.ts app.module.ts |
You should be warned about a few important differences though:
- this is not Java. Behind Typescript there is nothing but Javascript and that means, in runtime all types are equal. You will dodge a lot of the trouble implied by this if you avoid implicit and explicit anys. Still, you may find unpleasant surprises if you do not sanitize and validate inputs: receiving strings where you expected arrays or floats and similar .
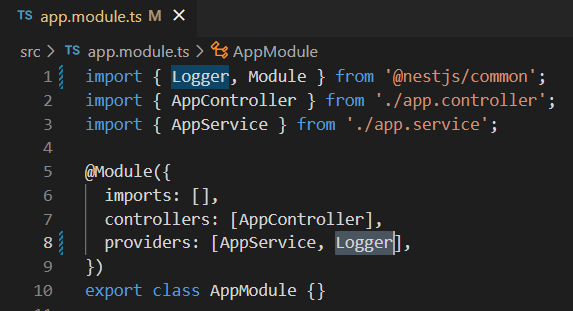
- unlike Spring Boot, most services are not automatically discovered. You will need to manually declare services in the module file. This affects even the simplest things, like when you inject a Logger:
Once you are done with „Hello world“-ing here are the things I suggest you to do next…
Use .editorconfig and ESLint from the beginnig
You most likely do not work alone: there is a team by your side, there are pull requests and there are code reviews. If every developer in the team uses their own IDE format configuration the code reviews will be full of junk – huge amounts of whitespaces or End-of-Lines that are completely unnecessary. Spare yourselves that. Use .editorconfig and ESLint. If you pull the .editorconfig file into the repository and all developers use the VSC extension, you will all use the same format when you open the project folder. You can find precise instructions in https://editorconfig.org but the easiest way to go is to simply use the minimal editor configuration compatible with ESLint, as in Figure 3. This way you will get the benefits of autoformatting while coding and global formatting with eslint.

Global format can be applied running the script
>> npm run lint --fix
Use safe commits
Most professional projects will not only involve coding but also automated tests. You do not want to be the one that commits and opens their pull request… just to find out that you forgot to run the tests, which suddenly fail because you forgot to adapt the to the changes you made in the code. Here is an advice: do all of it at once when you do your final commit. How? Use a script! You already have when you started the app and when you linted – all those commands that start by „npm run ***“ are custom scripts defined in package.json. I like to use the script „fcommit“ as defined in Figure 4, which combines linting, testing and commiting if the previous succeeded. Then instead of:
>> git commit -m „Commited something
you will need to run:
>> npm run fcommit -- „Commited something“
Now you just ran out of excuses to forget testing! Unless unit test themselves have problems to run, which lead me to the next point…

Avoid absoulte import paths and „barrel files“
If your project is sligthly larger than a „Hello World“ then its structure will be more complex than a single directory with all classes in it. Many developers separate classes in directories named after the kind of purpose they fulfill, e.g. src/services, src/controllers, etc. Or maybe by Use Case addressed. However you chose to structure your project it will most likely not be all classes together in a directory! If you also take automated testing seriously, as you should, you may soon face an additional difficulty: all imports work perfectly and give no problem either to the IDE, compiler or during the application building process… until you try to run tests on Jest and see this:

This problem had me puzzled for a while and I do not seem to be the first. For example, you can find some related discussions in the issue section of NestJS, although it is not a NestJS issue (https://github.com/nestjs/nest/issues/4953 or https://github.com/nestjs/nest/issues/5933). To avoid unnecessary drama, here is a simple hint: while Visual Studio Code uses per default the shortest possible import syntax, of the form src/*, also called „absolute path imports“, the auto-generated Jest-configuration of NestJS assumes that you are using „relative path imports“, that start with ./ or ../ whenever you are importing a class from the same project.
You can either configure Jest to find modules other than node_modules https://jestjs.io/docs/configuration#moduledirectories-arraystring or reconfigure your Visual Studio Code to use relative path imports per default, either in the settings menu or adding the settings file specified below (include it in Git so every developer has the same configuration). When I work in NestJS I use the second approach.


Similar problems of classes not found when running Jest are met when „barrel files“ are used. Barrel files are a common way to pack multiple imports in Javascript, where you declare multiple exports in a single index.ts file
Make sure that you never commit restricted content
There are plenty of stories about developers who accidentally committed things like database passwords or AWS credentials that were later used by people who should not (see for example https://www.youtube.com/watch?v=N6lYcXjd4pg). You should avoid by any means sending credentials and other restricted information to the project repository, even if it is an internal repository of your company.
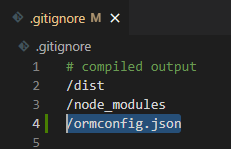
A very simple way to accomplish this is to add to .gitignore any configuration files, like *.env (if you are using @nestjs/config https://docs.nestjs.com/techniques/configuration) or ormconfig.json.
If you want to send to the repository a sample file for documentation purposes you can simply add a „dummy“ file with the .example extension, removing any compromising information and using placeholders instead.
There are more elaborate ways to achieve this but if you are just beginning this should keep you safe for a while. It is the bare minimum.
Here is where you ask: wait, what is ormconfig.json and why is it not in my project structure? Well, let’s go to the next point…
PERSISISTENCE WITH TYPEORM
I said I would lead you a bit further than „Hello World“, right? How about adding persistence to your project? You will need to install additional packages:
npm i --save @nestjs/typeorm typeorm mysql2
I used MySQL but depending on yours you will need to install a different package. You will find further instructions here https://docs.nestjs.com/techniques/database. Again, if you have previous experience in Spring Boot, the following analogies will let you speed up the learning process:
Persistence:
| Spring / J2EE | NestJs |
| Hibernate | TypeORM |
| JpaRepository<MyEntity, Long> | Repository<MyEntity> @InjectRepository(MyEntity) |
| @Entity @Column | @Entity @Column |
| @OneToOne @OneToMany … | @OneToOne @OneToMany … |
To put it short, follow these steps:
- Add an ormconfig.json file (also „gitignore“ it asap, as explained above)

- Create the entity you need to persist
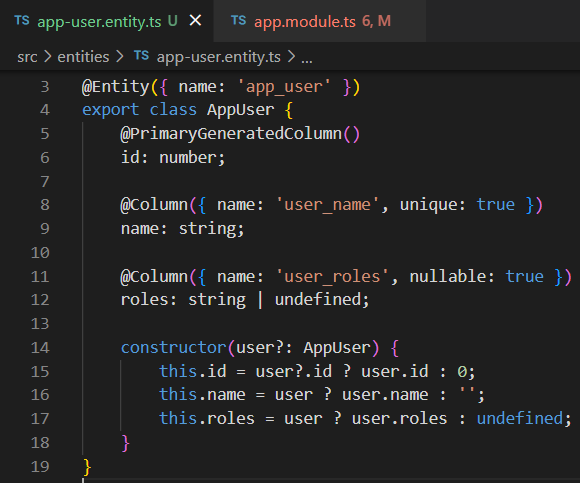
- Import the TypeormModule in your application module
- Declare the entity in your application module, so that a repository can be used

- You can now use @InjectRepository in the constructor of any class that needs it

You are ready to start implementing other entities and injecting TypeORM built-in repositories and use its methods and queries to persist your data. For the basics you can consult https://docs.nestjs.com/techniques/database and https://github.com/typeorm/typeorm. Here are some quick hints:
- No auto-discovery in NestJS: repositories must be declared in the app module and injected with @InjectRepository.
- It is a convenient habit to name your entities and their columns. It lets you easily avoid mistakes like using SQL reserved words, caps confusion or finding out that the names do not coincide with the names you used in your migration scripts.
- In the ormconfig.json.example we have set the config attribute „synchronize“ to false. You can let it be true the first time you run it. This will automatically create or adapt the database tables to whatever schema you have configured in your entities. It is of course a very bad idea to do that in a production environment, because data will be lost and schemas will change in sometimes unexpected ways. After the first productive deployment it is better to keep synchronization off, even in your development environment, and change the entities in your data base manually. This will force you to keep up to date the SQL statements that you will later need for migrations in the production environment.
- A not very obvious fact is that entity columns are not per default nullable. Also, the trynslation of types from JS to SQL are not always straightforward. Typescript string/number are per default varchar(255)/int in SQL and you must specify anything else, like longer texts or floats.
- Like Hibernate, TypeORM will expect your entites to have an empty constructor. If you need a non-empty constructor for your entity you may use optional parameters.
- To need to declare and use entity relations I recommend you to start here: https://github.com/typeorm/typeorm#creating-a-one-to-one-relation
If you have set up the database of your project and have written some entities you are probably impatient on how to use it. Because so far, all your app does is still nothing but to respond „Hello world“ when you send a GET request to its address. Constructing a more detailed REST API will be our next step.
MORE ON REST APIS
If you have looked carefully into your sample project, you have seen the main controller and how it is declared in the app module. By adding a few more details you can already grasp pretty much all you need to know to build more complex REST services:
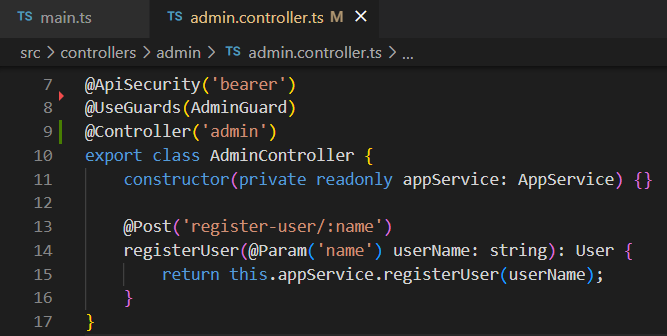
- All HTTP methods are handled by controller-class methods annotated with their names: @Get, @Put, @Post, @Delete
- Both in @Controller and in method @Get annotations you can specify a path. In the example, the full path would be localhost:3000/admin/register-name/{username}
- You can add path or query parameters easily with @Param and @Query. I stongly recommend you to validate these inputs with Pipes, see https://docs.nestjs.com/pipes
- You can also accept a @Body in a @Put or @Post. Validating the input is more complex in that case, consult the documentation on pipes given above or https://docs.nestjs.com/techniques/validation for more details.
Again, developers experienced in Spring will notice the following analogies:
REST:
| Spring / J2EE | NestJs |
| @RestController | @Controller |
| @GetMapping @PostMapping … | @Get @Post … |
| @PathVariable @RequestParam @Body | @Param @Query @Body |
Using Swagger
If you have Postman or Insomnia in your computer you can check how your endpoints work with that. A very useful alternative is to document your API with Swagger. To install it:
npm i --save @nestjs/swagger swagger-ui-express
In this case you need to bootstrap it in the main.js file, where your application is started:

And your application will generate an additional page at localhost:3000/swagger where you can consult and test your REST API.
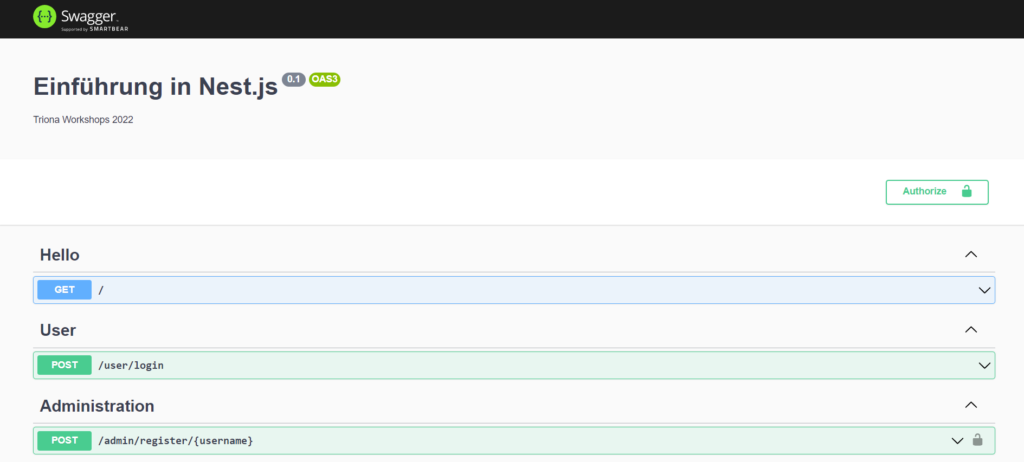
You can find further instructions in https://docs.nestjs.com/openapi/introduction.
Again, like with service discovery, not everything works automatically: Swagger will not document what you do not annotate in your Controller and DTO classes. For example, if you secure your API with a Guard (see https://docs.nestjs.com/guards) that requires Bearer authentication, you should declare it with @ApiBearerAuth. The DTOs that you use in the @Body of your @Post requests will need in their fields the @ApiProperty annotation or they will not show up in the interface. Swagger offers you plenty of other options to properly document the use of your API, any user with access to it needs little to no knowledge on the internal details of your app to make use of it correctly. Besides, it looks pretty.
Summary
In this entry we have given more advanced instructions for beginners in NestJS, with emphasis in those with previous experience in Angular and Spring Boot. After this the reader should have the basic knowledge and be familiar wirth the documentation required to face more complex projects.
